Showing posts with label tutorial. Show all posts

Wednesday, 25 September 2013

Light Box Photography 101

By The Megapope   Posted at  15:19   tutorial No comments

So I was sticking together my Mark IV Lightbox 3000 when it dawned on me that I hadn't documented my photography process for when I want more snazzy looking glamour shots. Admittedly I've been a bit lazy with the photos as of late, so I figured this was a good time to get back in the game and put together a post about how I make better looking miniature photos.

I use my wife's cheapy digital camera; the Samsung E15 which retailed for 150 bucks back in 2009. It didn't get particularly good reviews but then it was just made for mucking about with and taking 'glamour mode' shots at parties so whatevs!

Now, all us model painting nerds have looked at forums where people have shown off their newest mini with pride, only to have it backlit, out of focus and held in their greasy bear like paws. Why go to all the effort of painting a nice model just to show it off like this?

You may as well be holding a potato. 
Even if you manage to hold the camera super still and have your model lit from the front like the below pic, the model itself looks pretty nice but you're still distracted by all the background clutter going on. This ultimately takes away from the piece you want people to look at. Games Workshop show off their pretties with a white background for a reason.

Great, now it's a painted potato.
So we come to the light box! If you already know how to make a simple light box, this likely isn't going to teach you anything new, but who knows! You've stuck this post out so far so you may as well continue.

Part the first: assemble your box!

For the light box itself I just took a cardboard box, cut off two of the sides and lined the left and right interior surfaces with white paper. I then got a larger piece of paper and bent it gently across the bottom and back surfaces without creasing it, so it makes a nice concave bend. This stops you seeing any crease or join lines behind the model in photos. EASY AS PIE, BUDDY.
Precision NZ craftsmanship.
Next up we want some good light sources to shine onto your model. Ideally the lamps should have white 'daylight', not yellow bulbs, though even the cheapy digital camera I'm using has white balance mode which compensates for the yellowish light. BEHOLD THE TWIN ARMS OF LAMPY DOOM. I find that two light sources works best as they help prevent a shadow appearing behind the model and onto the white paper. 

Some people have three, five or a hundred lamps, each one with another three tiny little lamps coming off the main one. Go nuts! 
Excuse the messy desk. Or not, I don't mind.

Part the second: Shooting!

Here's a photo I took on my phone just to show what the setup looks like when I'm ready to shoot. (It's not actually dark in the room, the overhead light's also on!) I have one lamp a bit more forward and shining onto the front of the model and the other one positioned so it's shining straight down.
"I'm ready for my close up. Praise the Emperor."
I also position the camera onto the surface of the table, to make it as stable as possible and eliminate any possible hand shaking that might mess with the focus.

Your camera will likely have a 'macro' setting for shooting small things close up. Make sure this is turned on!

When it comes to other camera settings, the E15 is surprisingly versatile for its price and has white balance and a good range of exposure settings to choose from. I recommend messing around with your camera's settings to see how bright you can go before model starts going misty or the white background becomes too glaring. There's also a ton of basic digital camera tutorials available online.

Oh, and TURN YOUR FLASH OFF. NO FLASH FOR YOU. DO NOT USE THE FLASH.

Part the second point one: more words on lighting

Sometimes natural daylight is the best light source, and you can get great results by positioning your light box in front of a window that has lots of diffuse indirect (as in not direct sun-beams) light coming in. Below you can see three variations using the same model.

"Pew pew!"
Rose tinted visor.
"I could hold this pose all day."
The first one is using my two lamps and the overhead room light. The second one uses a window with the overhead light on, and for the third I adjusted the white balance some more and just used natural daylight (it's current raining outside with lots of white sky which can be great for model photos).

I was happiest with the last photo; the first was okay but I found the muzzle flash on the model was getting too washed out wheras the second has better detail but the combination of lights and white balance filter made it way too red tinted.

The take home lesson here is experiment with different lights and camera modes!


Part the third: post production! 

I know my way around Photoshop, which is hugely useful for making your photos look just a bit more sexy after you've chosen which ones to put up online. Obviously you don't want to mess with the image too much, you're showing off your mad painting skillz after all. But you can very easily use the Levels or Curves functions in Photoshop to make the light or dark values just a bit deeper. If you check out the two Behemoth pics below, you can see how the first one looks just a little bit less exciting than the second, and literally all I did was a tiny adjustment to the image's light levels.
Almost there...
OH YEAH WORK IT BABY
Aaaaaand that's pretty much it really!  Light boxes are really the easiest way to get some nice looking photos of your finished work. The power is yooooooours.

Wednesday, 31 July 2013

Painting Station Review

By The Megapope   Posted at  11:14   tutorial No comments
So after three months of waiting, my painting station arrived! By the Emperor's withered testicles!

My friend and I ordered one each back in the misty reaches of April from the Polish company Hobbyzone. Their prices were very reasonable, though initially they didn't have a setup for delivery to the blasted wasteland of New Zealand. We haggled for a bit and they agreed upon a cheaper delivery price, which would take longer to arrive. I was in no hurry and promptly forgot about it for the most part.

Look! Boxes!


And inside, everything had survived the three month travel ordeal pretty much unscathed. One corner of the base had a slight bit of wear, easily fixed with some tape to stop it from deteriorating further. 


The instructions were easy to follow. There was a lot more gluing than I anticipated, but that's not really a complaint so much as just an observation.


Now for anyone else getting one of these stations, there's three pieces of wood that act as support beams for the shelves that you have to bend and fit into curved slots. One of the beams was 2 cm too long for the slot and so had to be cut to fit, and then it's just a matter of being very careful as you glue then bend it into place. Just slot one side in and then bend the rest into place in increments and you'll be sweet.

I then employed a ton of old fantasy books to weigh them down overnight while they dried. My house smelled pleasantly like my highshool wood-working class.


The next day! I glued the three main frames onto the back support piece and waited for most of the afternoon while they dried, then adding the two side pieces and giving it another couple hours. I also added some tape just to keep everything in place, but it held up fine by itself while it dried. 


And then it was just a matter of gluing the shelving frame down onto the base and weighing the sucker down with a bunch of books for a few hours. I noticed that the whole unit wasn't quiiiiiite flush in places, some of the measuring or possibly component cutting was a bit off in places, but not enough that it caused any major problems. 


And here's the station ready for action!


And here it is with all my paints, tools and stuff in place, ready for use.


All in all I'm very happy with the finished product. It holds my paint collection very nicely with a bit of room to add more, plus brushes, small water cups, decal solution and some tools. Most importantly it provides an easily mobile station that I can pack away under the table with lots of surface area for models.

The cheap plywood material was a bit of a concern and I ended up running masking tape all along the bottom edges and corners so that it would have some protection in the long term, but I think that's what you get for the low price and I don't really see that as much of an issue.

Would definitely recommend it! 

Sunday, 26 May 2013

Object Source Lighting 101

By The Megapope   Posted at  13:45   tutorial No comments

So after fumbling around a bunch I decided to do a Noobs Tutorial™ about my ongoing Object Source Lighting attempts. Basically this is about painting a model to make it look like a glowing object is lighting up part of it. Great for power weapons, flames, radioactive demon possessed cats, etc.

Disclaimer: This isn't intending to come across like I'm an expert at this whatsoever. This is OSL 101, I'm sharing as I'm learning. So with that in mind...

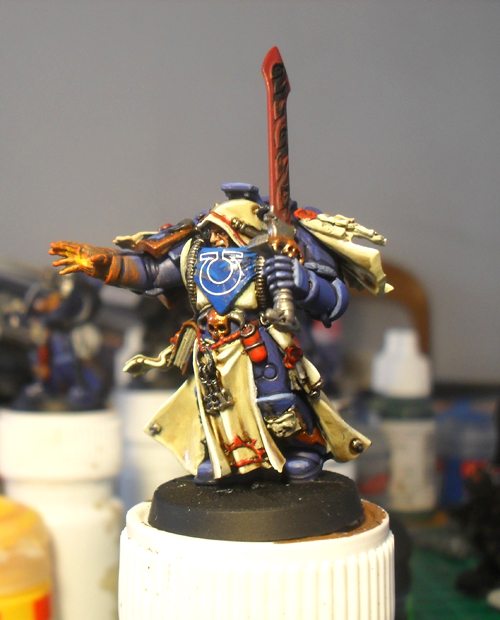
Model being used: Ultramarines Librarian. This is how he looked before I started.


So what I want to do is make his force sword look like it's glowing and casting light back onto the model. Looking at where it was positioned, I figured the light would be hitting the side of his cloth hood, the top of the blue psychic hood, the front of his shoulder pad and the edge of the purity seal on that shoulder pad. 

Quickie diagram below!


I got to painting and ended up with this.


HOW I DID IT

The main technique I used was heavily watered down paint for the flat areas, including the side of his head, the purity seal (photo didn't capture that very well but you can hopefully make out the red), etc. By heavily watered down, I mean putting paint on your brush, then dunking it in your water pot a couple times, and then wiping some paint off onto some tissue before putting it on the model. You're building up layers which will start off very subtle. This lets you build up the gradient, by which I mean less to more intense colour reflection.


But then I realised building up a soft glow didn't work where the light hit hard edges, so that became a matter of doing a standard line-highlight for the edges in the same colour. That for me was what made the difference from okay looking to... more okay.

I also used a brighter line highlight for the more reflective surfaces such as the metal pipe going into the side of his head.

Here's another shot of the sword if you wanna see that, with some glow going up around his head. 


So that's where I'm currently at. Like all painting it's a lot of trial and error and staring at other models a lot. The main tips I can share at my noob OSL level are these:
  • Use a mix of heavily watered down paint and edge highlights depending on what you're putting the glow onto
  • Imagine a 3D globe that is hitting your model from the source of the light and try not to miss anything out inside that globe
  • Remember that the light won't be uniform as it hits the model, it'll gradient away the further away it travels
  • Expect to mess up a lot but paint through the pain
Aaaaaand that's my OSL for complete noobs. This model is still a work in progress, I'm hoping to get it looking better over the next day or so, with some more layering along the hood to make it stand out a wee bit more, brightening up the whole effect.

More pics, though these were taken under a yellow tinted lamp.


Saturday, 30 June 2012

The Strippening

By The Megapope   Posted at  21:16   Warmachine No comments

Well folks, I got there in the end. Took me roughly five hours spread over four days and two litres of Simple Green™ but all of my Khador models have been thoroughly cleansed of their old paint jobs.


Naturally I must post about it for future internet achaeologists to puzzle over. Who was this strange beardy man? Why was he holding a toothbrush like that?

So if you haven't done a mass stripping of models before, this might well be informative. Or at least mildly entertaining.


STEP ONE, THINGS YOU WILL NEED.

Black aprons are so in this season
An appropriately dashing cleansing uniform! I found an apron to be pretty useful as stuff flicked everywhere during the frenzied scrubbing. Rubber gloves are also your friend here, as Simple Green™ will otherwise leave your unprotected meat digits looking and feeling like mummified prunes. Also an old toothbrush, for the actual scrubbing. PRO TIP: don't use it again afterwards.

How can she not be excited?? It's just so piney fresh!!
Here is my beautiful assistant posing with the Simple Green™ that I got from the local home depot store. 

A red bucket would have gone faster, but we use what we have.
You will also need a well ventilated bathroom or workspace, a bucket, a secondary container (not shown) for working in if you're going through a lot of models at once, and the ability to sit by yourself scrubbing little metal robots like a crazy person for extended periods of time.


STEP TWO: GIVE IT A BIT OF A SOAK, JIMMY.

It's a metaphor for human existence. 
All of the models! Into the bucket! Easy! 


This isn't a metaphor. It's just a bucket.
 Dump two litres of piney fresh Simple Green™ on top! Give it a bit of a stir!


Kinda like the Manawatu River. OH NEW ZEALAND IN-JOKE TIME.
THE NEXT DAY. Oh look it's gone dark and dubious looking! That's how you know the magic's happened.


STEP THREE: GETTING JIGGY WITH IT. (nah nah nah nah nah-nah-nah nah)

Mmmm sludgetastic 
It dissolves fake snow! It dissolves super glue! The models came apart as I cleaned them! This was okay, as I planned to repose a bunch of stuff. But I did have to be careful not to lose any tiny fiddly bits in the increasing amounts of sludgey muck accumulating in the bottom of the tub.


"Rubber duckie, you're the one..."
Here is an exciting action shot of some models in the tub. I kept most in the bucket soaking, but tipped a bit of Simple Green™ into the secondary tub to facilitate the scrubbing process. I really can't stress enough at this point, wear gloves. 


"Dude. Where the fuck are my limbs?"
This is what was left of the Behemoth after a vigourous scrub. The rest of it was sitting in the tub, it just came apart pins and all. Simple Green™, DON'T MESS WITH IT FOLKS. 


STEP FOUR: WALLOW IN YOUR NEW MINIS

The bitter aftermath of the piney fresh destruction
Make sure you clean all your bits with soapy water to get rid of any Simple Green™ residue! I hear it can mess up your undercoat and painting otherwise. SAFETY FIRST KIDS. 

As you can see, there are still some bits of red paint in the nooks and crannies of some of the models, that would frankly have taken more hours to get rid of than I was willing to put in. My tactic is to scrape off a bit more with a knife during assembly stage (it comes off pretty easily) and then if there's any tiny bits still showing in recesses after undercoating, just use some watered down black paint to mask them off.

Get your jack pieces here! We got big ones! And, uh... more big ones!
Important after doing a huge batch! Go through all your parts and make sure you haven't lost anything. I used a colander to pan through all the sludge and crap like a gold miner before throwing the Simple Green away, and I found quite a few tiny metal spikey bits and other little parts that had fallen off. Amazingly (for me) I managed not to lose a single piece during the cleaning, pretty much because I was anal retentively thorough. 


He likes long walks in the park and throwing shit into other shit
Aaaaaand here's the Kodiak ready to go. Pinned, cleaned, glued and undercoated.


He just likes killing people. What a bastard.
 Aaaaaaand here's a blurry photo of the Butcher, likewise all ready to be painted. VICTORY FOR THE MOTHERLAND.


Saturday, 9 June 2012

Dark Borders

By The Megapope   Posted at  17:50   Warmachine No comments
Slow week for painting so far, but I plan on hopefully finishing some more things off tomorrow. But! Excluding transfers the Juggernaut is now all based and finished up. I added another two thin line highlights along some parts of it which I think helps match it closer to the Manowar officer.

"ARE YOU NOT ENTERTAI...oh you are? Well, good then."
TALKING OF WHICH the Manowar squad has had some more paint applied oh holy crap this is off the hoooooook. Sorry. And I undercoated their shields and shoulder pads today too! Which isn't really blog worthy but since that's all I did you're getting pics of it anyway.

That's some gooooooood shapeless black masses. Ohhh yeeeeeeah.
Them? Nah they're 'armless guv.  I am SO sorry.
You might have noticed that these photo thumbnails are looking extra sexy, and you'd be right! I've started using a vignette when I prep them in Photoshop, and it's pretty easy to do. A vignette creates a darkened, gradient edged border around the centre of the pic, adding contrast and drawing the eye into the middle of the image. 

There's a million different ways to do most things in Photoshop. This tutorial is pretty close to how I make vignettes though. If you use PS to prep your photos for the web, I highly recommend trying it to sauce up your pics a bit. 

Back to top ↑
Contact!

Who is this beardy weirdo?

My photo
Hatching from his egg high in the glacier crowned majesty of the Himalayas, the Megapope quickly devoured his other siblings and later on his parents, for being damned cheeky. He ran a bloody campaign of terror across the wind swept steppes of the north, coming to be known as 'That Horrid Bastard' by the terrified tribes of the region. Many years later he came second in a beauty contest, won $10, didn't pass Go and didn't collect $200.

Important legal disclaimer

Important legal disclaimer
© 2013 Paint Nerd . WP Mythemeshop Converted by BloggerTheme9
Blogger templates . Proudly Powered by Blogger .