
Mention to any wargame-y nerd type that you're painting an Imperial Fists, Lamenters, or Iyanden army, and they'll make a sharp intake of breath through their teeth, then comment on how brave/stupid you are for volunteering to paint that much yellow.

Well more the fool them, because painting yellow is not hard at all.
Some of you may be stroking your luxuriant neck beards and saying to yourself "hmm yes, just slap some Iyanden Darksun on there", but you would be wrong*. The yellow foundation is great for spot-painting areas of yellow on a larger miniature, but for figures that are mostly a bright yellow, all you really need is one thing.
A white undercoat.
First, a slight digression.

Space Hulk! Like many others I rushed to order the limited re-release of GW's classic boardgame, attracted by the high quality game parts and intricate and unique miniatures.
And then I proceded to file a bunch of the detail off said intricate miniatures because sod the Blood Angels. If anyone's going to go on a potentially suicidal mission into the heart of a Space Hulk, it's not going to be a bunch of blood drinking emo vampire wannabes. It's going to be the Imperial Fists.
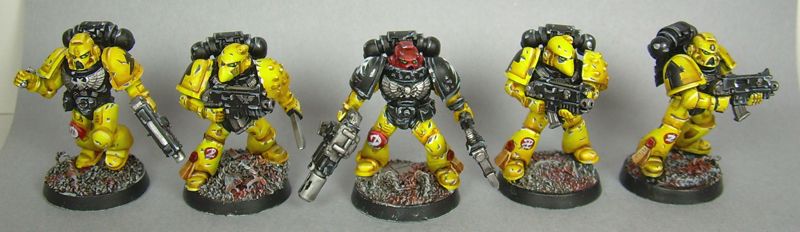
 Following this tutorial, I sculpted Fist icons on the right shoulderpads. I'll be the first to admit that they're a bit rubbish. I was hoping that I could make them look a bit better with paint (which I also failed at, as you'll see later). But they get the point across.


Undercoated with black gesso, a basecoat of Iyanden Darksun, then Golden Yellow, more Golden Yellow to cover the bits of horrible black/darksun that still showed through, highlighting towards Sunburst Yellow, then towards white. Astronomicon Grey on the white parts, and oh god I just want to gouge out my own eyes this is horrible.
Okay, so the gesso undercoat was probably too thick**, but even so, this yellow just wasn't doing it for me. In fact I was so annoyed by it that I put them aside for a year, but not before donning a hair shirt in pennace for my arrogance. All those yellow nay-sayers were right! Who was I to dare to try where they had failed?
Salvation came in the form of the talented Something Awful Forums poster known as PaintVagrant and his excellent Marines Malevolent. There was no fancy recipe behind the bright shade of yellow, just a white undercoat. Since I couldn't remember the last time I'd primed white, I figured it was high time I experimented.


Because the terminator is mostly large curved surfaces, I used a lot of feathering and blending to create smooth gradients. I'm very pleased with how the yellow turned out, though pretty much every other color is a bit half-assed. The white was another experiment, Skull White shaded with increasing Codex Grey mixes, rather than my usual Astronomicon Grey highlighted with white.


And just so I don't feel too smug, look at how badly I highlighted the fist icon. Look at it. Hideous. That white looks a bit sloppy too, to say nothing of the silver. Oh god, where did I put that hair shirt...
* Actually you can get a pretty good desaturated mustard yellow out of Iyanden Darksun. I just don't like it.
** Gesso is an acrylic primer often used by painters, it has a slight "tooth" that makes it suitable for miniature painting. It shrinks when it dries, allowing you to slap it on then be amazed as all the detail is revealed when it dries. Having used it for a few things, I still prefer spray priming but it's a good alternative if circumstances don't allow the use of an airbrush or spraycan


Interesting and useful post dude. I've experimented with yellow several times and haven't settled on good option for my Imperial Fists. There are a lot of differing opinions on black verses white undercoating, and which combination of yellows to use.
ReplyDeleteI've also used Iyanden Darksun and found it a little too mustard like for my liking. I'll give your tips a go on my next batch.
Any suggestions on how you would best apply that technique large surfaces like tanks?
Another cool yellow technique that I've seen goes like this:
ReplyDeleteUndercoat white
Paint the model a peach colour, basically 1 part blazing orange with lots of skull white.
Highlight up to white
Then go over it a bunch of times with watered down yellow ink.
The results are quite nice looking. If I remember I'll try and find the link that shows the WIP.
Andy, with tanks I would suggest a colored spray. I think Army Painter do some yellow sprays, though a lot of them are a sandy yellow.
ReplyDeleteCheers. I was going to try using a spray gun with some watered down golden yellow if it doesn't look too watery.
ReplyDeleteYeah an airbrush would be ideal.
ReplyDelete